Maverick Blogger Template Installation Documentation, a step to step guide to help you out to set up your blog easy way.
First of all, Thank you for Downloading our template if you haven’t done yet you can get it from here: Maverick Blogger Template. You check the live demo through the button below and also Please Read this documentation carefully in order to set up your blog and please note that there’s no support for free users.
1. Installation
Open your purchase folder, you will see a file with name Maverick-(Free or Premium)-Version.xml
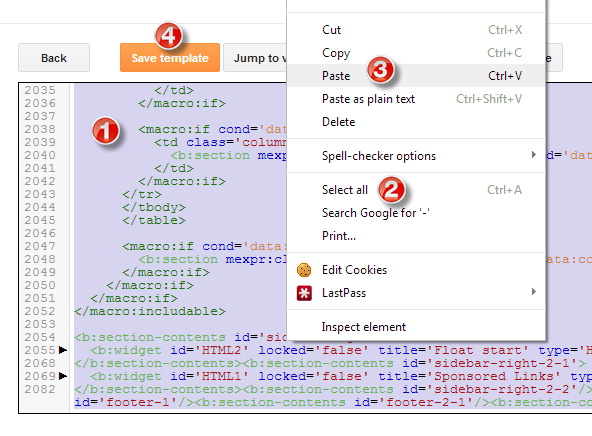
Open this XML file with a text editor (Notepad or something like that). Then select all text and copy (Ctrl+A, Ctrl+C in Window).
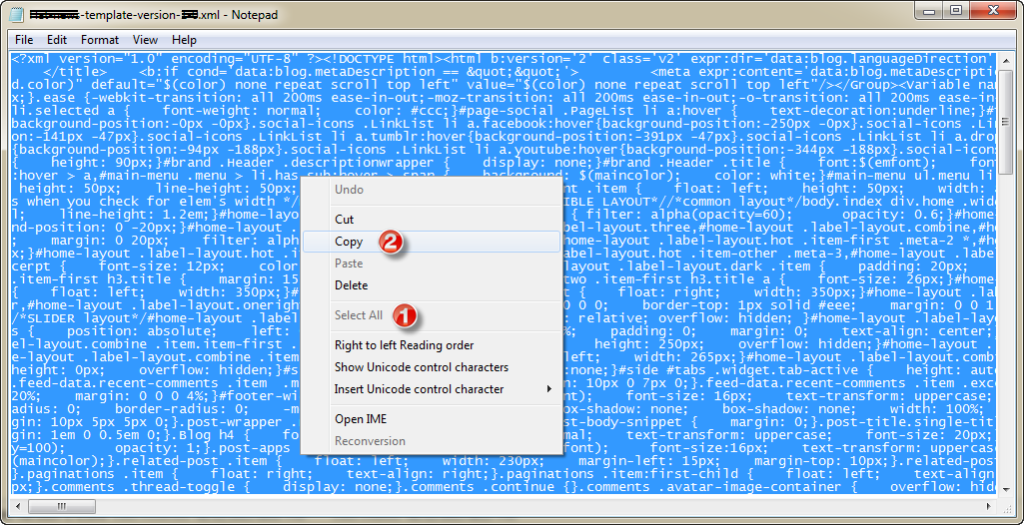
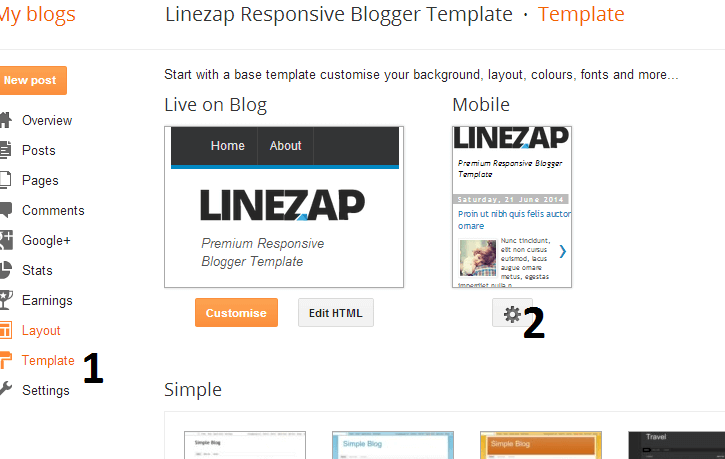
Return to your blog dashboard, access your Template menu, click Edit HTML
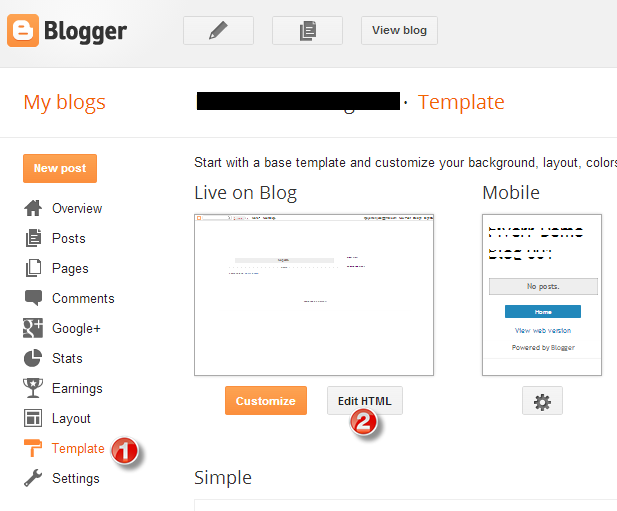
In Editor HTML window, select all old code and paste the new code that you copied from the release file into code field. Then, click Save template.
Video Guide : –
2. Setting Up The Menu

To Edit Top Menu in this theme you can follow this step:
1. Go to -> Blogger Dashboard- >layout -> Pages – > press edit button.
2. Now choose ( check mark ) those pages you want to show on menu and press save. You can also add the external link just press ADD external Link and add you link then save it..
Go to Blogger Dashboard > Template > “Edit HTML”
Now Search the below mention code ( ctrl + f ), then replace the # with your navigation urls.
Main Navigation :

 <nav class='pi-navigation' data-menu-responsive='992'>
          <div class='container'>

 <div class='open-menu'>
              <span class='item item-1'/>
              <span class='item item-2'/>
              <span class='item item-3'/>
            </div>
            <div class='close-menu'/>
            <ul class='navlist'>
              <li><a href='/'>Home</a></li>
              <li><a href='/p/about.html'>About us</a></li>
              <li><a href='#'>Drop Down</a>
                <ul class='sub-menu'>
                  <li><a href='/search/label/Shooter'>Minimal</a></li>
                  <li><a href='#'>Sub Menu with Subs</a>
                    <ul class='sub-menu'>
                      <li><a href='#'>Feminist</a></li>
                      <li><a href='#'>Persona</a></li>
                      <li><a href='#'>Expose</a></li>
                    </ul>
                  </li>
                  <li><a href='#'>Powergame</a></li>
                  <li><a href='#'>Fashion</a></li>
                </ul>
              </li>
              <li><a href='#'>Restaurant</a></li>
              <li class='megamenu col-5'><a href='#'>Mega menu</a>
                <script class='java' type='text/javascript'>//<![CDATA[
                  var numposts = 5;
                  var outerclass = "sub-menu";
                  var starttag = "<li>";
                  var endtag = "</li>";
                  var intag = "div";
                  //]]>
                </script>
                <script class='java' src='/feeds/posts/default?alt=json-in-script&callback=labelthumbs' type='text/javascript'/>
              </li>
              <li><a href='#'>Download</a></li>
            </ul>
 <div class='search-box'>
              <span class='icon-search'>
                <i class='fa fa-search'/>
              </span>
              <form action='/search' method='get'>
                <input name='q' type='search' value='Search and hit enter'/>
              </form>
            </div>
          </div>
        </nav>
MEGA MENU
In above you will see this below mention code, that is for MEGA MENU
<script class='java' type='text/javascript'>//<![CDATA[
var numposts = 5;
var outerclass = "sub-menu";
var starttag = "<li>";
var endtag = "</li>";
var intag = "div";
//]]></script>
<script class='java' src='/feeds/posts/default/-/LABEL?alt=json-in-script&callback=labelthumbs' type='text/javascript'/>
1. Change the word LABEL with your label for posts
2. Change the number “5” inside numposts = 5; with your needed number of posts
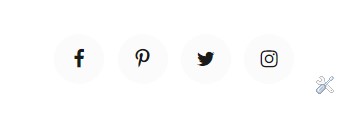
3. Setting Up The Top Social Menu
![]()
To Edit Top Social icons in this theme you can follow these steps:
-
- On Blogger Dashbord Click Layout
- Top Social Widget Click Edit button
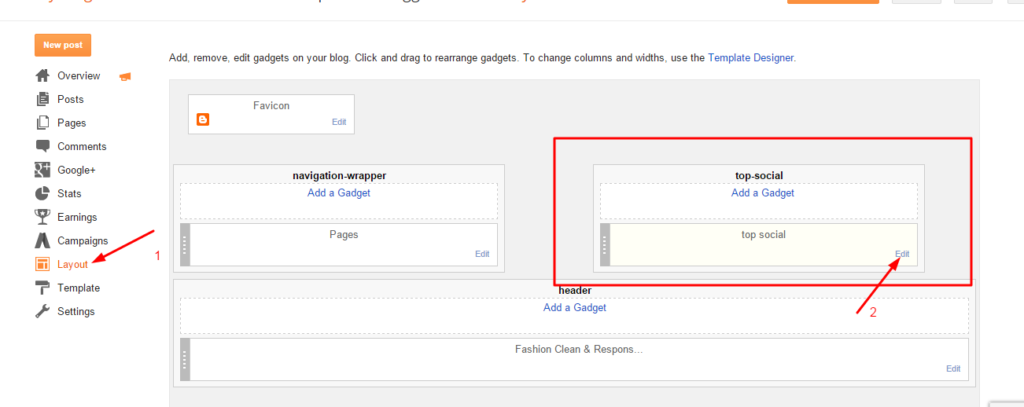
Add your social media name and link >> ADD LINK >> Once you added all the links SAVE.
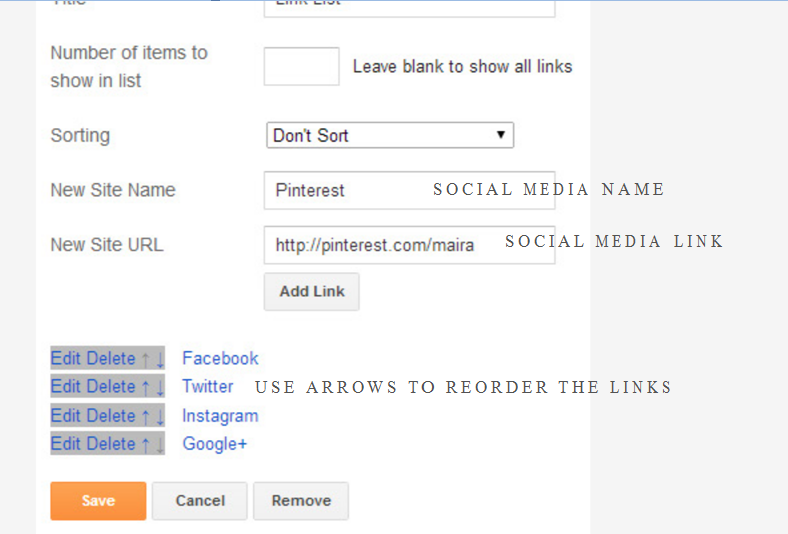
Use http:// or https:// where applicable.
To Edit Sidebar Social icons in this theme you can follow these steps:
-
- On Blogger Dashbord Click Layout
- Top Social Widget Click Edit button
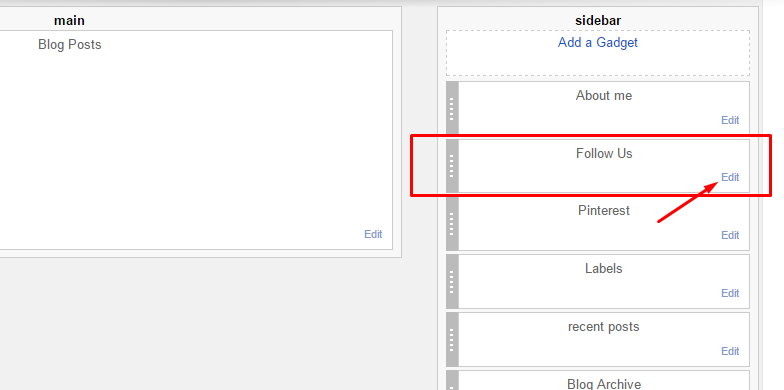
Add your social media name and link >> ADD LINK >> Once you added all the links SAVE.

Use http:// or https:// where applicable.
AVAILABLE ICONS:
Behance Facebook Twitter Bloglovin Dribbble Flickr GooglePlus Instagram Linkedin Pinterest Vimeo Youtube Vine Soundcloud Goodreads Deviantart Foursquare Reddit Tumblr Spotify Twitch Vk Mailto shop Rss Etsy
Video Guide : –
4. About The Author Widget
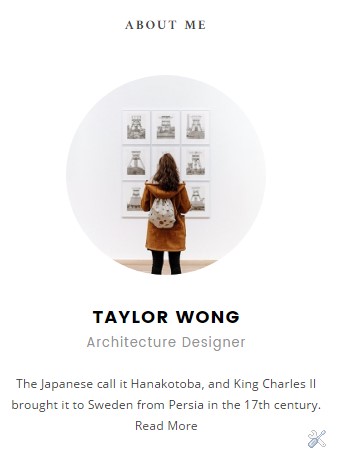
To Author Widget in this theme you can follow these steps:
- On Blogger Dashbord Click layout
- Click Edit On Author Widget
- Add The following code
<div class="about-me">
        <img src="http://3.bp.blogspot.com/-ojzRtpJZw6E/VQk3l9nnFrI/AAAAAAAABnU/skDzx4vL5xc/s1600/photo-1416339684178-3a239570f315.jpg" alt="About Amalie" />

        <p>Lorem ipsum dolor sit amet, consectetur adipiscing elit. Praesent non leo vestibulum, condimentum elit non, venenatis eros.</p></div>
- Change Image Url with yours URL link and text with your text.
6. How To Set Date On Post
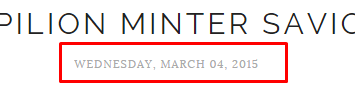
Go to Blogger Dashboard > Settings > Language and Formatting > Formatting > Timestamp Format > set it to date instead of time
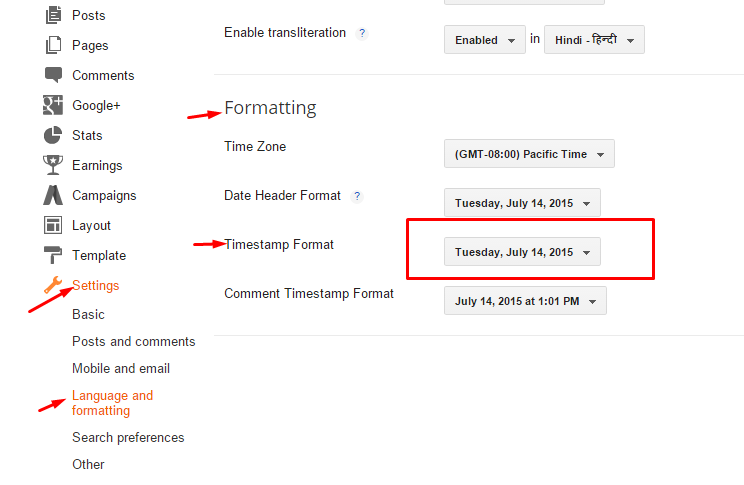
Save it
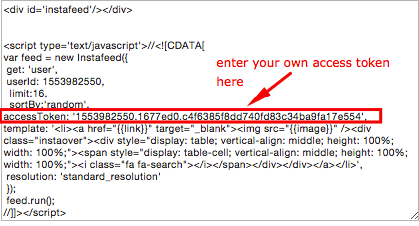
7. Instagram Widget

1. Go to Blogger Dashboard > Layout > Instagram widget > click on edit button > Edit Html
2. Now copy the below mention code and paste into widget.
3. Now you need to create your access token
<div class='insta-wrap'>
<div class='my-insta-box'>
<a class='btn-style' href='//instagram.com/xposetheme' rel='me'>FOLLOW ME @INSTAGRAM</a>
</div>
</div>
<div id='instafeed'/>


<script type='text/javascript'>//<![CDATA[

var feed = new Instafeed({
 get: 'user',
 userId: 10008029,
  limit:16,
  sortBy:'random',
accessToken: '1531863919.1677ed0.23d238bc564249e799095d060c750218',
template: '<li><a href="{{link}}" target="_blank"><img src="{{image}}" /><div class="insta-likes"><div style="display: table; vertical-align: middle; height: 100%; width: 100%;"><span style="display: table-cell; vertical-align: middle; height: 100%; width: 100%;">{{likes}} <i class="fa fa-heart"></i><br/>{{comments}} <i class="fa fa-comment"></i></span></div></div></a></li>',
 resolution: 'standard_resolution'
 });
 feed.run();


//]]>
</script></div>
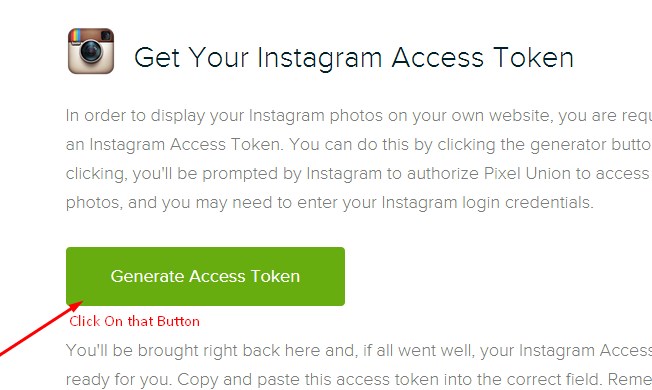
you need access token for instagram widget to work Go to this url-> Click here to Generate access token

| Note | |
| Generate Access Token | you need access token for instagram widget to work Go to this url-> http://instagram.pixelunion.net/
Generate access token |
| Sign In and Follow the steps | Then You’ll be given an access token like this 1531863919.1677ed0.23d238bc564249e799095d060c750218 |
| Follow The next step | Add Instagram User ID: |
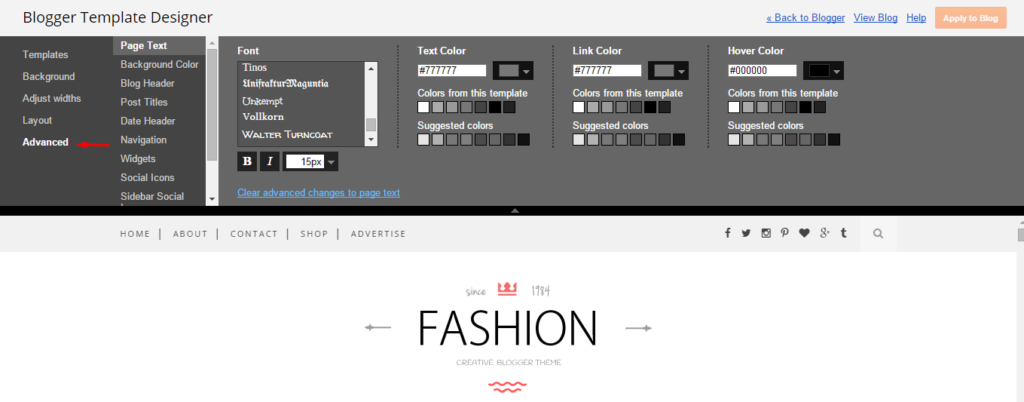
8. Customizer – Change The Color And Font Of The Template (Only Avialabel In Premium Version)
Go to Blogger Dashboard > Template > Customize
Now Click on Advance > Main color -> change color according to your need and then press apply button.
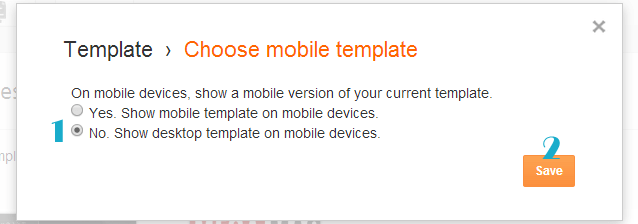
9. Mobile Version ( Responsive Design Option )
Mobile Responsive
After you apply mobile version for this template, Color changing option will not work. This is official bug of Blogger. So, please make sure, you used Color changing option before do this step.
As default, Blogger will use its own template for you blog on mobile. So if you want to use Fashion template on mobile devices, please enable it first.
Access your Template menu and click on Gear button of Mobile template.
In Choose mobile template window, check “No. Show desktop template on mobile devices.” option, then click Save button.